Trial molding is a critical step in mold validation. It not only verifies the mold structure but also establishes the process parameters for production. A well‑planned trial saves time, reduces costs, and prevents unnecessary mold modifications.
Material Selection for Trial Molding
Wherever possible, the material used for trial molding should match the production material exactly. This ensures representative results and simplifies inspection and validation.
However, if the exact grade is not readily available, a substitute material may be used — but it must satisfy two key conditions:
Important caution: During the trial, if the substitute material results in short shots, poor ejection, or molding defects, do not jump to modifying the mold. Instead, carefully analyze whether the issue is caused by differences in material properties. Modifying the mold prematurely — based on results from a substitute material — may introduce problems that are difficult to reverse once production material is used.
Setting Up Trial Molding Process Parameters
Once the material is selected, ensure proper drying — especially for hygroscopic materials. Never assume that drying is unnecessary simply because the parts are “only for trial” and not production parts. Moisture‑related defects can easily mislead the trial results.
The goal of a trial is to establish a reasonable set of process parameters. However, during the trial, the mold itself may have design or manufacturing issues that affect molding. When results are unsatisfactory, it can be difficult to distinguish between process‑related and mold‑related causes.
Recommended approach:
Start with a theoretically sound set of parameters based on the part design and material grade.
Assume that the mold structure and dimensions are reasonable.
Adjust the parameters step‑by‑step, focusing on the basic process conditions.
Estimating shot size:
If a sample part is available, measure its weight and use the material density to calculate the required shot volume.
If no sample exists, estimate the volume from the part geometry and use it as the baseline.
After the trial, record the actual shot size used. This record serves as a reference for future trials and production.
Injection pressure:
With more plastic parts being used in precision engineering applications — many with complex geometries and tight tolerances — higher injection pressures are often required. For precision parts, injection pressures can reach 230–250 MPa.
Holding (packing) time:
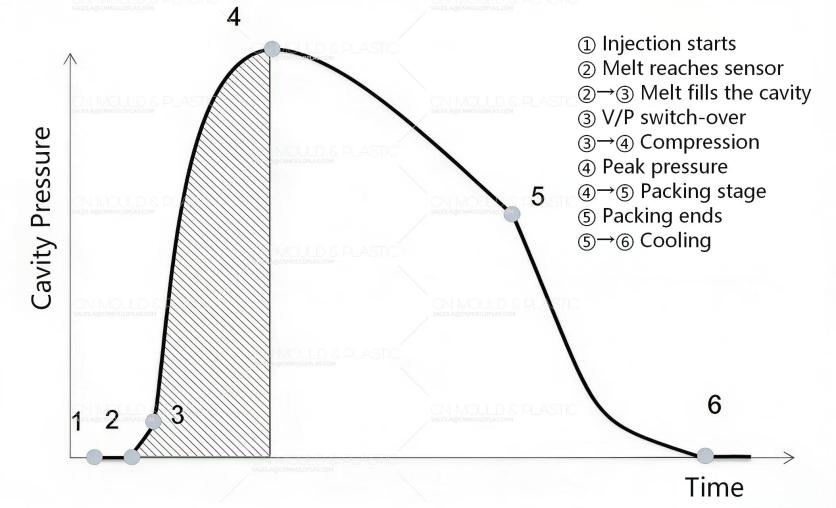
Holding time is typically set based on experience. However, a more accurate approach is to use a cavity pressure curve (pressure vs. time). This provides a data‑driven basis for determining the optimal packing time, improving consistency and reducing guesswork.

 English
  français
  Deutsch
  Español
  italiano
  русский
  português
  العربية
  dansk
dansk  Suomi
Suomi  Svenska
  norsk
norsk